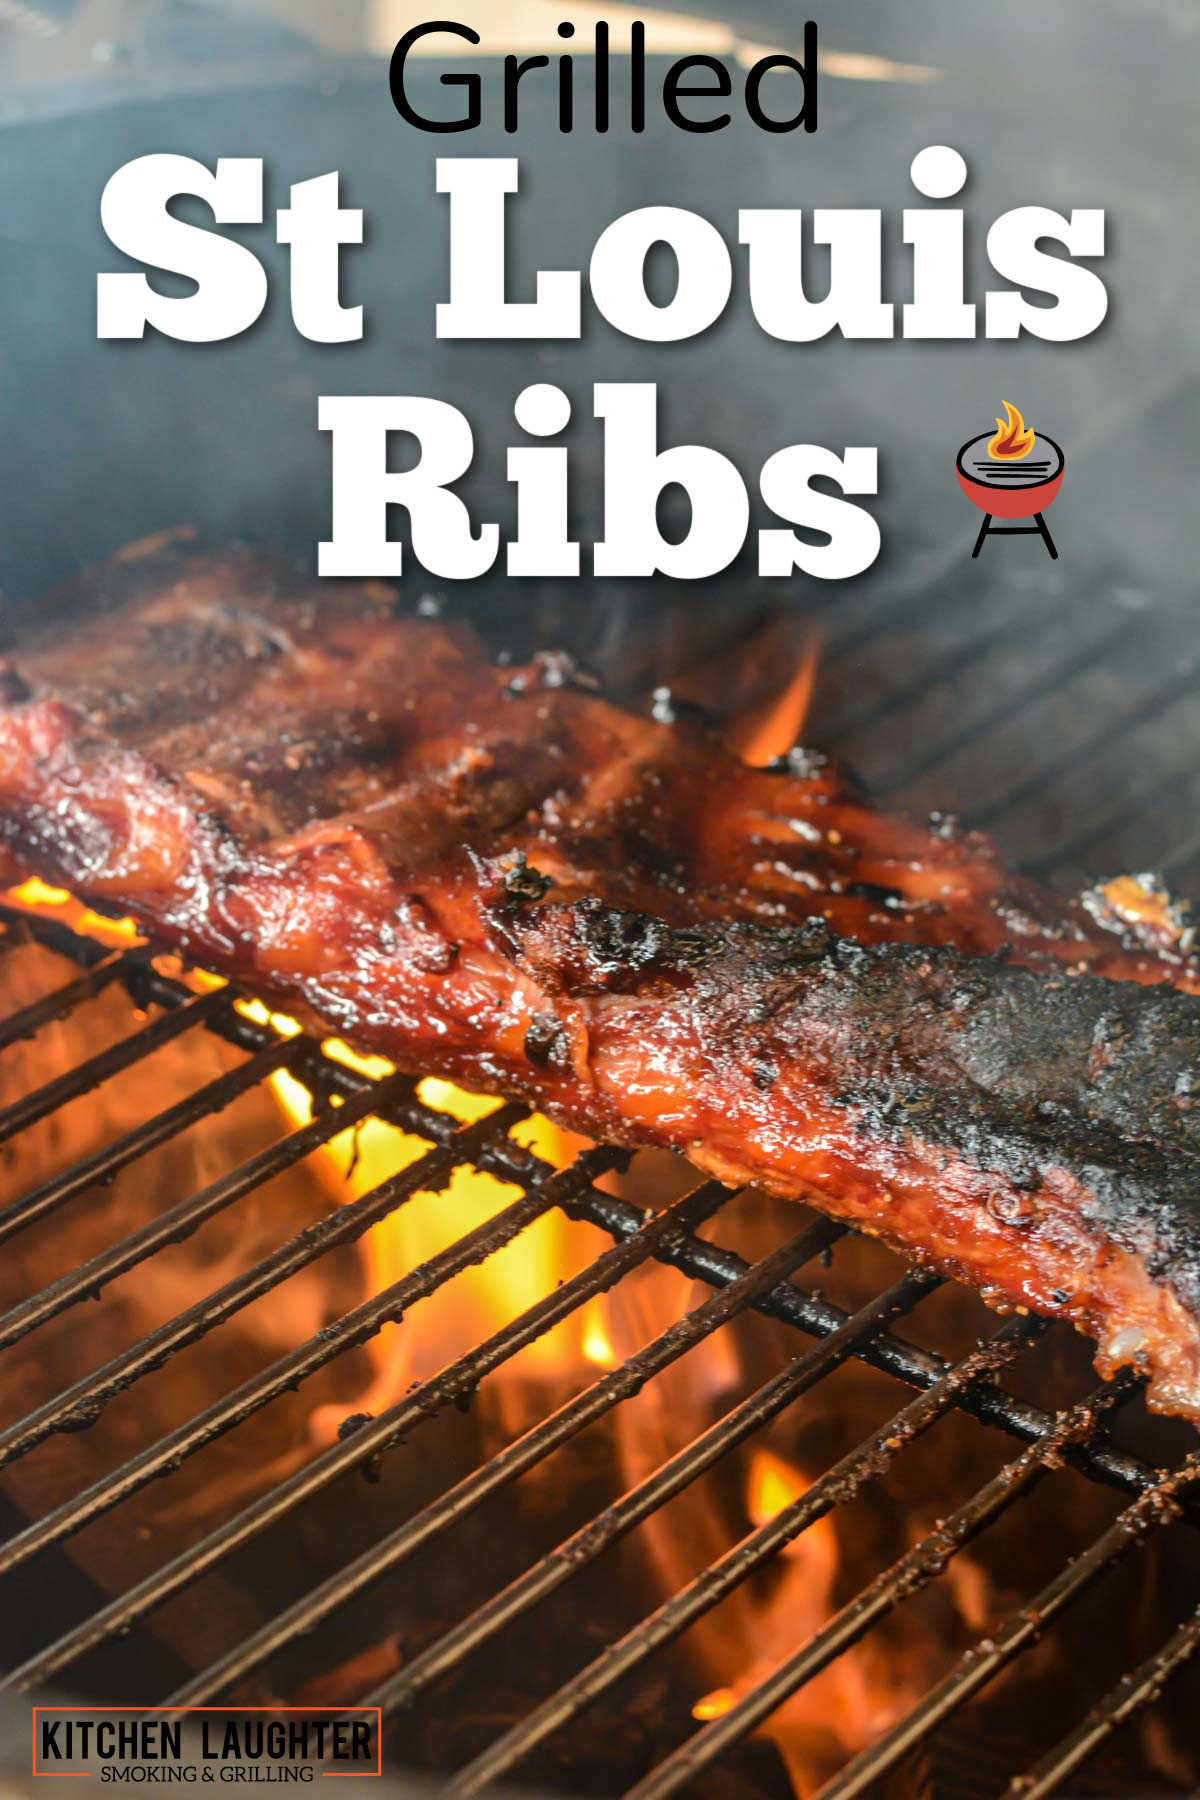
If you want to serve your guests succulent, melt-in-your-mouth ribs that everyone will rave about, our grilled St Louis Ribs recipe is your go-to solution. The incredibly satisfying BBQ flavor of this juicy rib meat is over-the-top when you use a foil-wrap glazing method and bring your St. Louis style ribs in for a stellar finish.
Pork ribs are a beloved BBQ staple – several types and a million recipes, added to the smoky kiss of a charcoal grill…it’s hard to get bored of ribs!
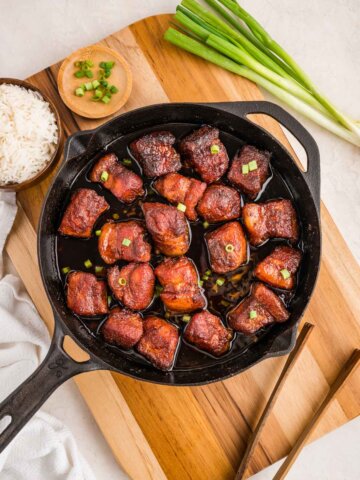
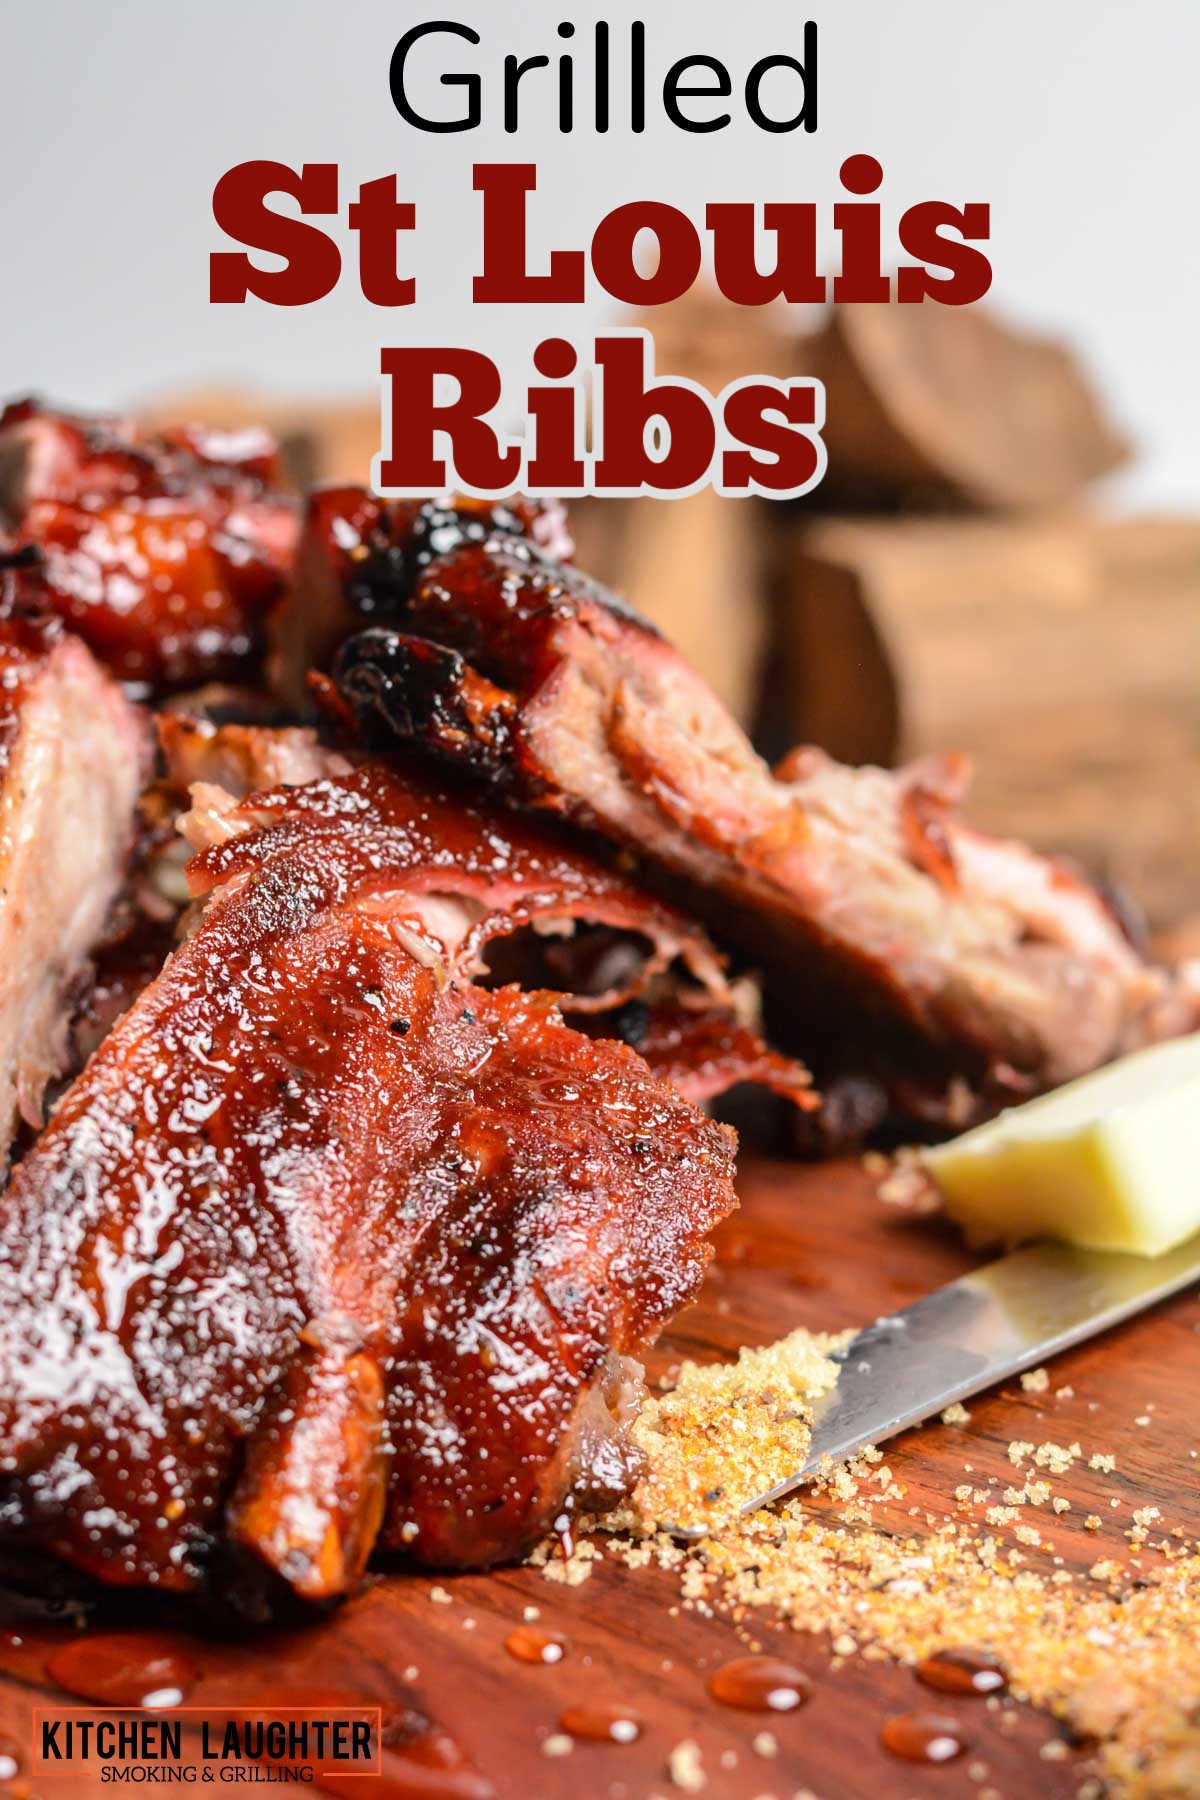
This past weekend we sunk our teeth in these tender St. Louis style ribs and the last pieces sparked a competition.
I used a mild homemade dry rub and a simple glaze made with honey, butter, and brown sugar for a rich and slightly sweet finish. I think what mattered most was the foil wrap glazing method.
It allowed the sugars to caramelize and the meat to cook, but gently, for the best flavor infusion!
🍖 Ingredients
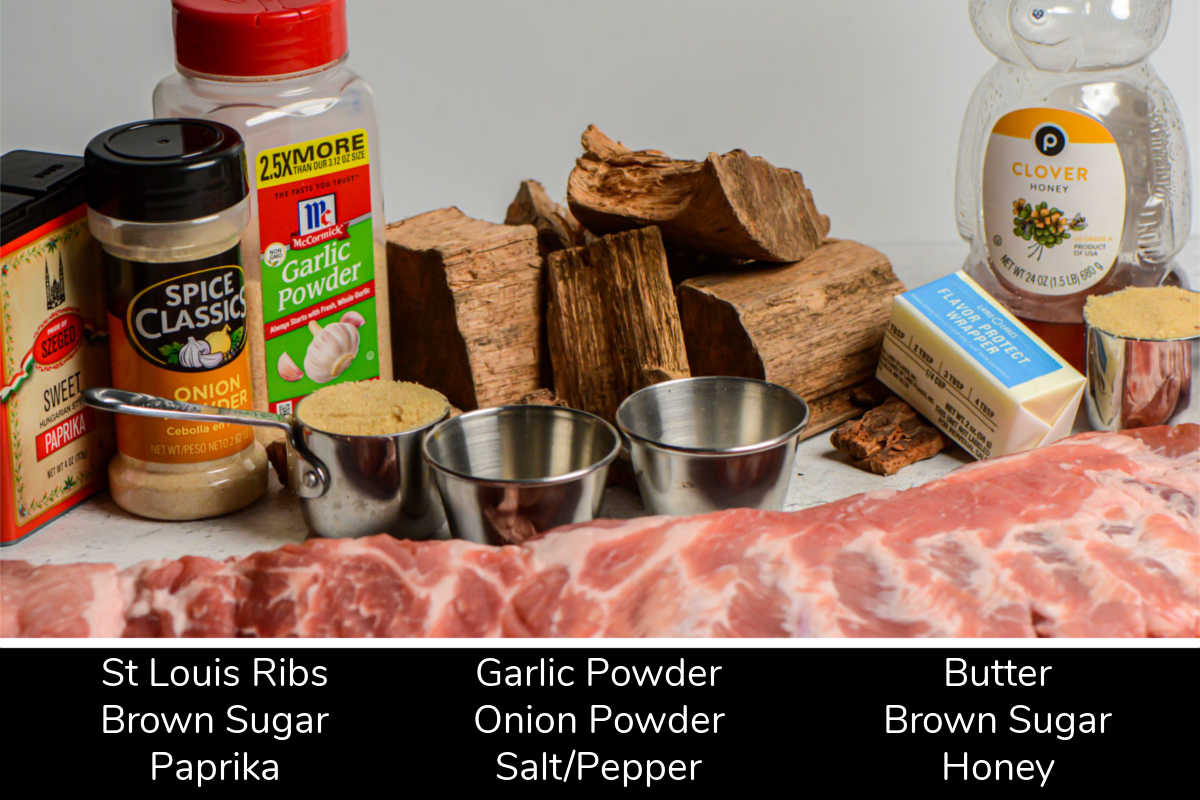
St-Louis-Style Ribs – When you are purchasing ribs at the store, you can usually find baby back, St. Louis style, or boneless ribs. For this recipe, we used St. Louis-style ribs.
Dry Rub – We used a simple homemade dry rub made up of ingredients you probably already have in the pantry. Brown sugar, paprika, garlic, and onion powder, and some salt and black pepper. Use light or dark brown sugar, whichever you have is good.
Glaze – Don’t skip the glaze. This is a three-ingredient option using butter, brown sugar, and honey. Since it is fairly sweet, it will complement any of the spices you used in the dry rub.
⏲️ Equipment and Tools
Grill | We use a Big Green Egg, but since this is a simple direct heat grilling recipe, any BBQ will work wonderfully.
Smoking Wood | Grilling over charcoal will naturally add a smoky flavor to these ribs. For gas grills and electric grills it’s a good idea to add some smoking wood chips or chunks. For ribs, we love the milder apple wood and cherry wood but you can take things up a notch with a medium oak or use hickory to experience an intense aroma. Check out our Smoking Wood Chart and our guide on the best wood for smoking ribs for more options and pairings!
Foil | Our St. Louis Style ribs are wrapped in heavy-duty aluminum foil with the glaze ingredients for thirty minutes. It’s the “secret sauce” that brings everything together. Remember not to add any extra liquid to the foil pack.
🔥 Instructions


Step One: Make the dry rub by combining all of the ingredients in a small bowl or jar and stir or shake to break up all the chunks of the brown sugar. Since it makes so much, store it in a jar for other recipes.


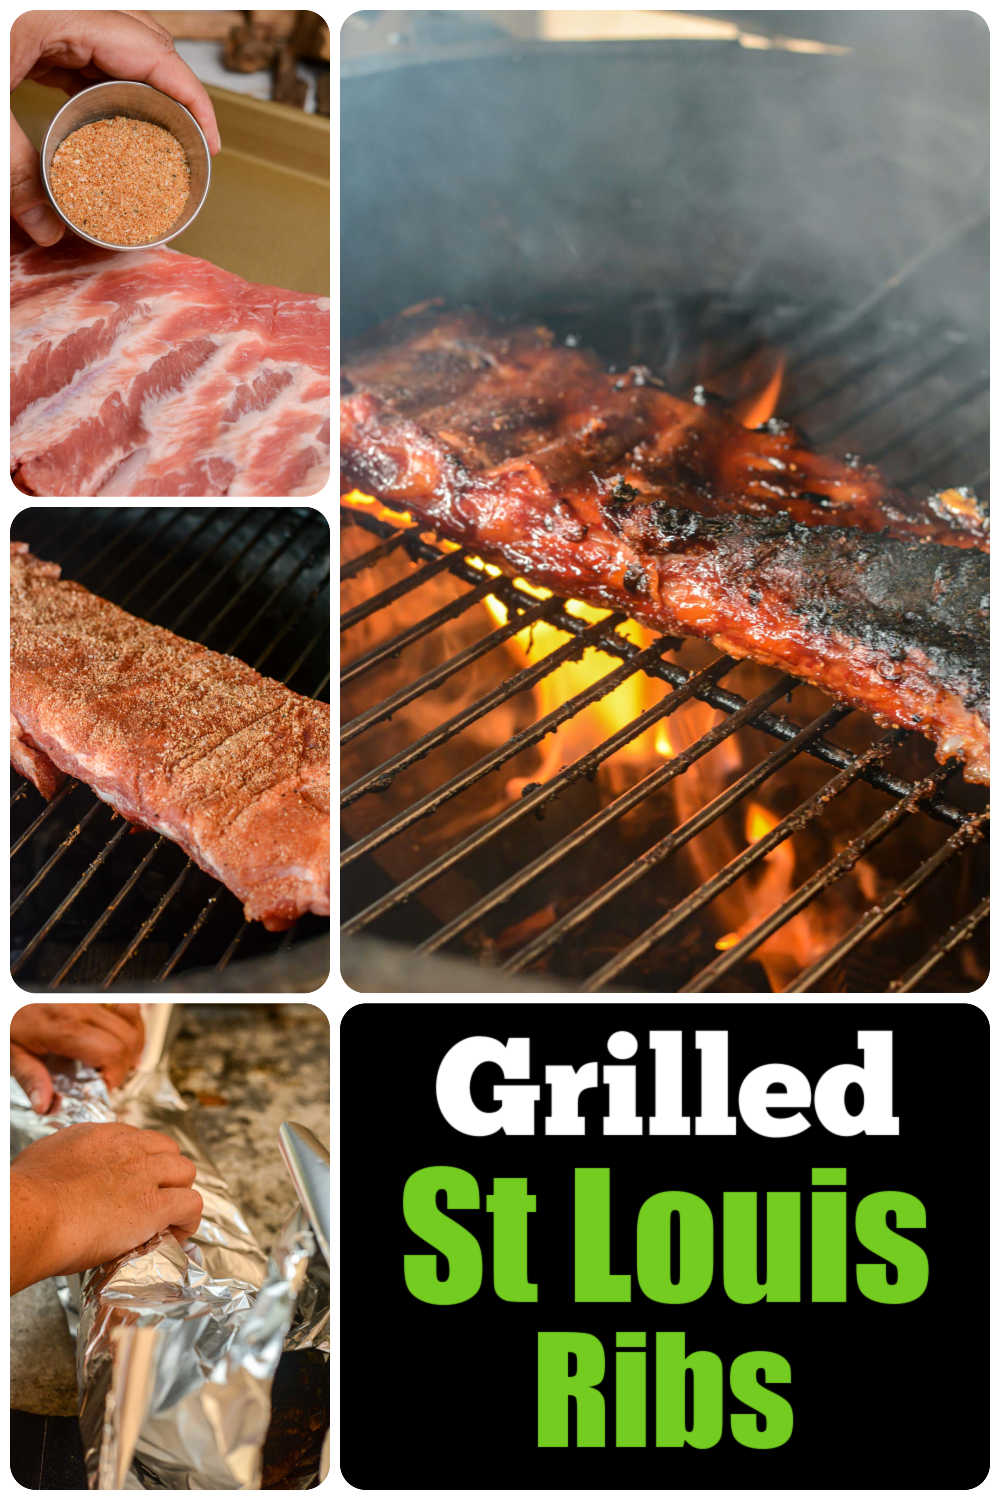
Step Two: Remove the membrane on the ribs if it is still attached. Pat the ribs dry with a paper towel and then coat them with a dry rub. I recommend going a bit heavy with the dry rub.

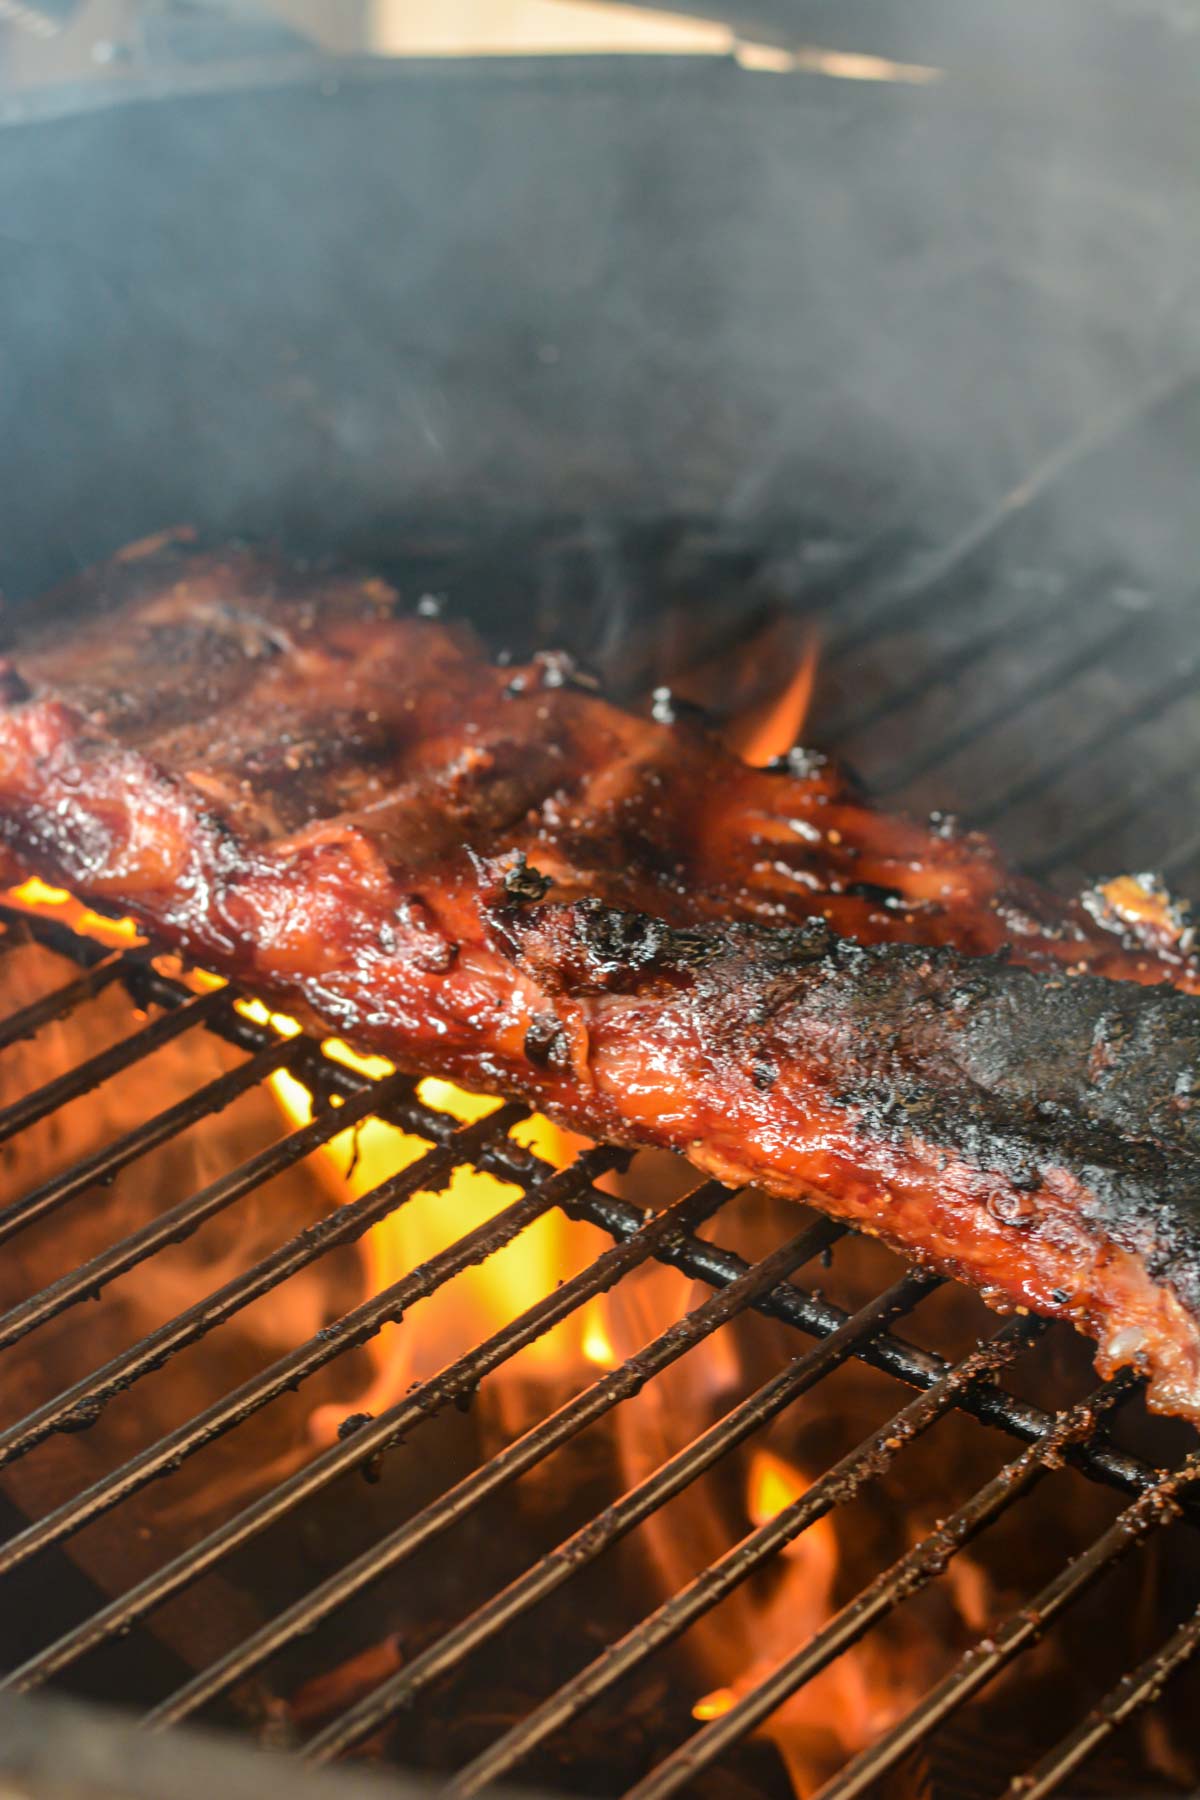
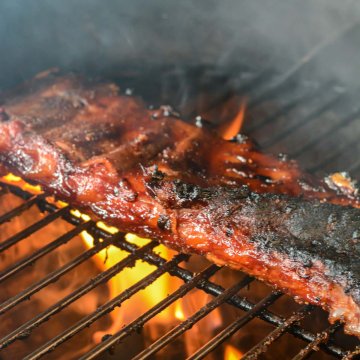
Step Three: Grill for 60-90 minutes at 300°F using direct heat. The time will vary depending on the thickness and marbling of the meat.

Step Four: After the ribs have reached an internal temperature of 200°F, it is time to add the glaze and finish it off. Prepare the foil for the ribs by laying out two layers on the countertop. Add the brown sugar, butter, and honey as shown in the photo above.
Note: While the USDA notes that 145°F is the minimum temperature to cook pork, it will result in tough and rubbery ribs. Instead, let these come up to about 200°F. That extra temperature will break down the connective tissue and will result in extremely tender and tasty pork ribs.


Step Five: Remove the ribs from the grill (we like to place them on a baking sheet) and add them to the foil. Fold the foil over to seal everything together and let it grill for 30 more minutes.

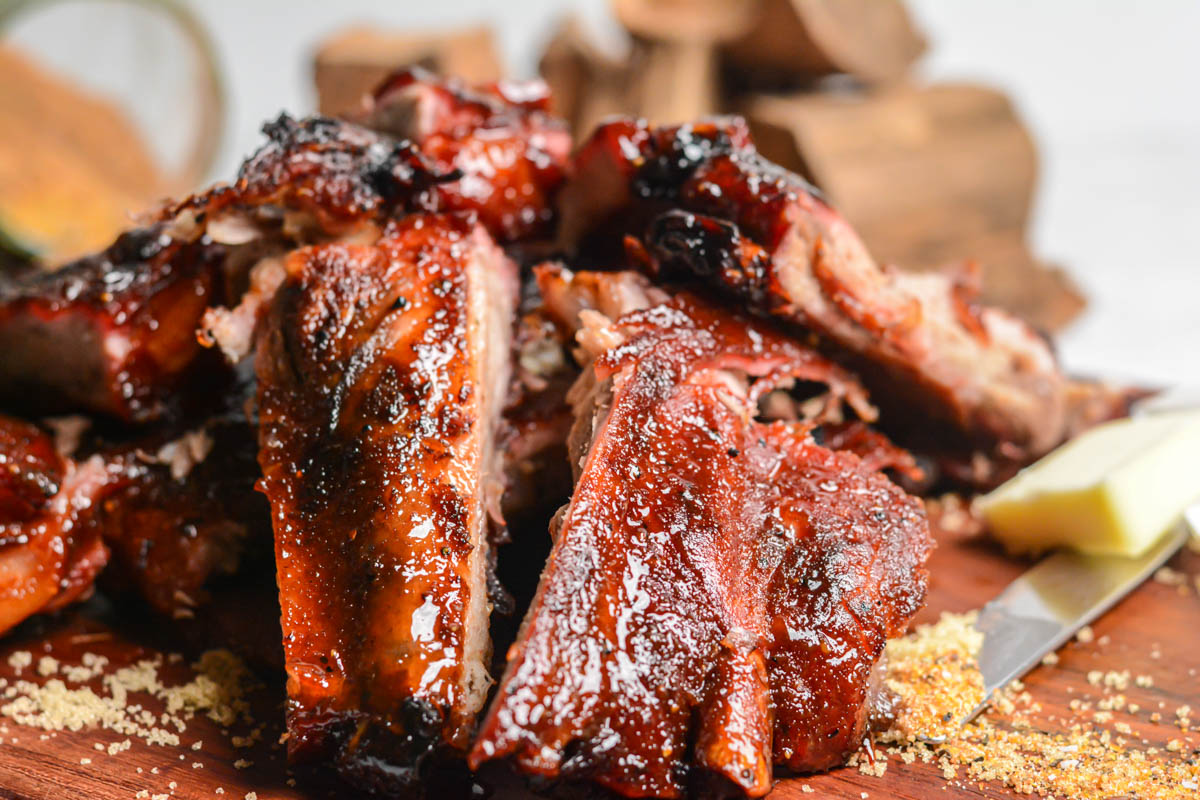
Step Six: Coat the ribs in the glaze or a barbecue sauce for the last five to ten minutes of grilling. Remove from the grill and transfer to a cutting board or a platter. Let the ribs rest for five minutes before serving.

Step Seven. Use a sharp knife to slice the racks into individual ribs. Simply slide the knife into the meaty section in between the bones. Brush with extra glaze or BBQ sauce before serving and enjoy!
Put out your charcoal grill in a snap with these couple of tricks.
❗ Our Favorite Tips and Tricks
- Overlap the foil so that you don’t have any leakage of butter which can cause flare-ups on your grill.
- Make sure you rub the “dry rub” into your meat for best results. Cover both sides of the rack of ribs.
- The easiest way to remove the membrane is to make a large slit down the membrane on the backside of the ribs or use a butter knife to slide under it and pull it up. Use a paper towel for grip because it is very slippery. The membrane should pull off in two halves – one on each side of the slit. If it does not, just lift the corner with a knife again and repeat the process until all of the silver skin is removed.
- If the ribs feel gritty when you remove them from the packaging, run them under cold water. The butchering process can leave bone chips on the meat.
- The dry rub recipe will cover three racks of ribs. Each rack will contain between 10-13 ribs. You should plan on at least 4 ribs per person and up to one rack per person if you have hungry college boys just coming back from the gym.
- Spread a layer of yellow mustard over the ribs to help the dry rub better stick to the meat. You won’t feel the mustard flavor in the cooked ribs but their acidic nature does help tenderize the meat.
- Don’t add watery ingredients inside the foil wrap. You might find others using liquids such as broth, apple juice, and apple cider vinegar but for this recipe, we do not want to boil the ribs. Stick to a glaze or a BBQ sauce for the best results.
- Some grillers like to let the ribs come up to room temperature before grilling them. Others say this is a myth and doesn’t impact the final dish. Those who prefer this method say that if the ribs are 20ºF closer to the final temperature when you start, you will have less overcooked meat on the outside by the time they finish. It takes about 30-60 minutes for ribs to come up to room temperature when sitting out on the counter, so if you have the time it is worth trying. Let us know in the comments what you think!
🧑🍳 Storage and Reheating
👉Refrigerate leftover ribs in an airtight container or freezer-quality sealed plastic bag for up to 5 days or freeze for up to 3 months. You can easily reheat ribs using various methods and this can be done straight from frozen.
👨🍳How To Make St. Louis Style Ribs In The Oven
If you can’t grill, follow the same basic recipe using your oven. You won’t get that nice crusty bark or smoke flavor you get from the grill but you will still have tasty results.
- Preheat oven to 300°F | 150°C.
- Mix dry rub ingredients until well combined and transfer to a jar.
- Use a paper towel to pull off the membrane of the ribs then pat them dry.
- Rub the seasoning on the ribs making sure all spots are covered. Be generous!
- Place the ribs on a sheet pan and bake for 60-90 minutes. This time is an approximation. Always measure the internal temperature of the ribs and take them out when they reach 200°F.
- In a small bowl, mix the honey, butter, and brown sugar to make the glaze.
- Apply a uniform layer of glaze and place the sauced ribs back in the oven.
- Broil for a few minutes for the glaze to caramelize.
- Rest for 5 minutes and serve!
🍴Serving Suggestions
Our grilled St Louis ribs recipe works great with so many BBQ sides!
The dishes below are all classic sides for ribs and it’s nice to have a few of them on the table for variety:
- A crunchy coleslaw is a great way to lighten up the rich and satiating St Louis ribs. My favorite is this spicy Creole coleslaw variation!
- Another great way to lower the calorie count of your feast without compromising on flavor is to serve some grilled or smoked veggies like grilled corn on the cob in the husk, grilled sweet potato wedges, grilled patty pan squash, or smoked asparagus bundles.
- Cornbread is another BBQ staple side that will make those ribs even more satisfying. If you have a smoker, try this easy smoked cornbread. You won’t regret it!
- Grilled Bourbon peach baked beans are a delicious variation of this traditional side and match made in heaven for grilled St. Louis style ribs, and other grilled meats.
- Smoked potato salad, pasta salad, and grilled mac and cheese are flavor-packed sides you can make ahead of your BBQ gathering.
- Garlic bread and homemade soft pretzel bites will be fabulous next to ribs. Even better if you also include a dipping sauce among your sides.
♨️More Smoked And Grilled Rib Recipes
When you’re not in a rush, you won’t regret the extra time needed to make these smoked St. Louis style ribs. The smoky flavor is off the charts!
Smoked baby back ribs and smoked country style ribs are also fabulous and you have so many options to customize them to your liking.
We love this recipe for grilled plum jam pork ribs if you want to try a little something different next time.
FAQ
It will take 1.5 -2 hours to make St. Louis-style ribs on the grill at 300°F. The important thing is to grill based on internal temperature. Make sure the ribs get to at least 200°F before removing from the grill. This is the internal temp to aim for if you want a pull of the bone texture.
Related Recipes


Tried this recipe? Please leave a star ⭐️⭐️⭐️⭐️⭐️ rating in the recipe card below and/or a review in the comments section further down the page. You can also stay in touch with me through social media by following me on Instagram, Pinterest, and Facebook!
Grilled St Louis Ribs
Equipment
- Grill
- Foil
- Sharp Knife
Ingredients
Rub
- ¼ cup Brown Sugar
- ¼ cup Sweet Paprika
- 2 tbsp Garlic Powder
- 1 tbsp Onion Powder
- 2 tbsp Kosher Salt
- 1 tbsp Cracked Pepper
Brown Sugar Glaze
- 4 tbsp Butter unsalted
- ½ cup Brown Sugar
- ¼ cup Honey
St Louis Ribs
- 1 rack St Louis Style Ribs
Instructions
Rub
- Combine all of the ingredients for the rub together in a bowl and stir break up all the chunks. ***There is enough rub to cover 3 RACKS OF RIBS***
Grilling Rib
- Remove the membrane, if it is still attached. The easiest way to remove it is to make a large slit down the back side of the membrane on the backside of the ribs.
- Using the combined rub from above, apply the rub on both sides of the rack of ribs and rub it into the meat.
- Heat up the grill to 300 degrees and place the ribs on the grill bone side down for 60-90 minutes.
- Lay out several layers of foil, overlapping so there isn't any leakage.
- Using ingredients from Brown Sugar Glaze: Place the brown sugar, honey and butter on the foil, place the ribs meat side down onto the brown sugar mix and the bring the sides of the foil up to fold tightly. Bring in the ends of the foil and fold tightly.
- Place ribs back on the grill for 30 minutes and the allow to rest for 10 minutes.
- Bring the temperature up on the grill to 375 degrees and place the ribs back on the grill for 5-10 minutes, to create a little bit of char to the glaze.
- Remove from grill and allow to rest 5 minutes before digging in.
- Use a sharp knife to slice the racks into individual ribs. Simply slide the knife into the meaty section in between the bones. Brush with extra glaze or BBQ sauce before serving and enjoy!
Notes
Nutrition

Ginny Collins is a passionate foodie and recipe creator of Savor and Savvy and Kitchenlaughter. Indoors she focuses on easy, quick recipes for busy families and kitchen basics. Outdoors, she focuses on backyard grilling and smoking to bring family and friends together. She is a lifelong learner who is always taking cooking classes on her travels overseas and stateside. Her work has been featured on MSN, Parade, Fox News, Yahoo, Cosmopolitan, Elle, and many local news outlets. She lives in Florida where you will find her outside on the water in her kayak, riding her bike on trails, and planning her next overseas adventure.
Kayla E. says
I tried this recipe out for Father’s Day today after my grandpa threw me a curveball by getting three racks from Costco. I’ve never done ribs before, and I needed to find a recipe that I only needed a grill for.
I was worried about burning them so the only alteration I made was doing the initial grill at 275 instead of 300, and I did 2 hours instead of 90 mins.
They came out fall off the bone soft. Absolutely delicious. Thank you SO much for this recipe. And if you’re reading this wondering if this method works- it does!! Give it a try!
Kayla, that’s awesome!! Thank you for taking the time to come back and let us know how great it turned out! Cheers! Ginny