This Smoked Brisket is flat-out going to gain you a whole new set of friends. It is so delicious, your neighbors will come knocking!
Smoked brisket is a staple in grilling. If you haven’t smoked one yet, this is your chance! If you want to smoke a big piece of meat with almost guaranteed success, sit down and let’s talk!
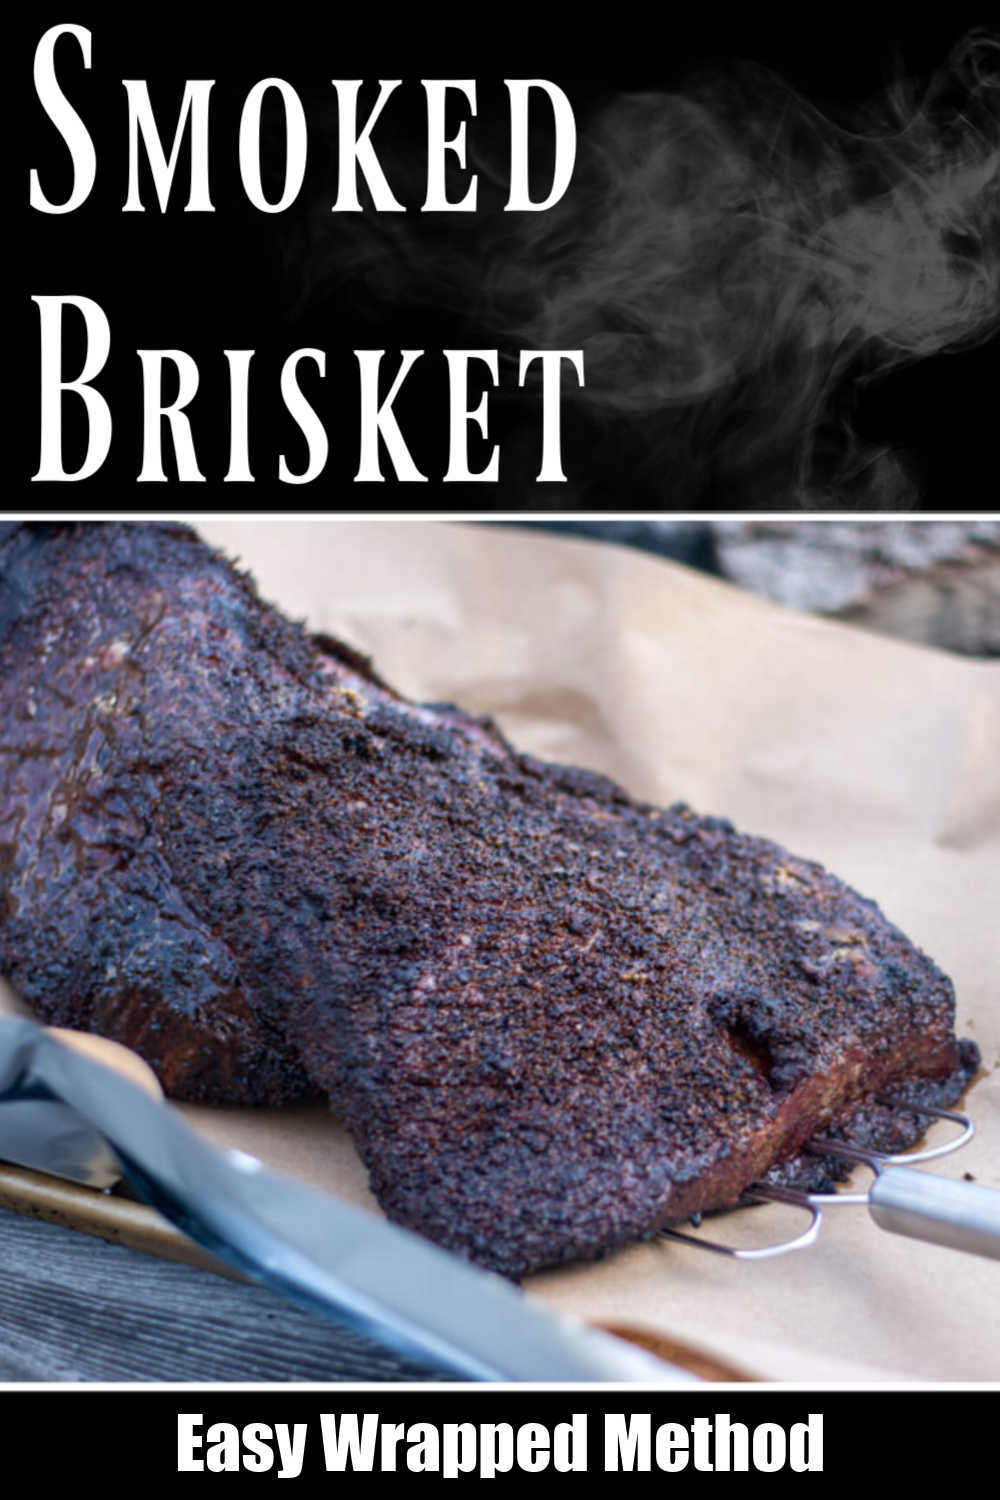
I smoked this brisket at a higher temperature and finished it in the oven to see if it could turn out as good as the slower-smoked version. This took around eight hours. And we are very happy with the results!
🐮 Ingredients
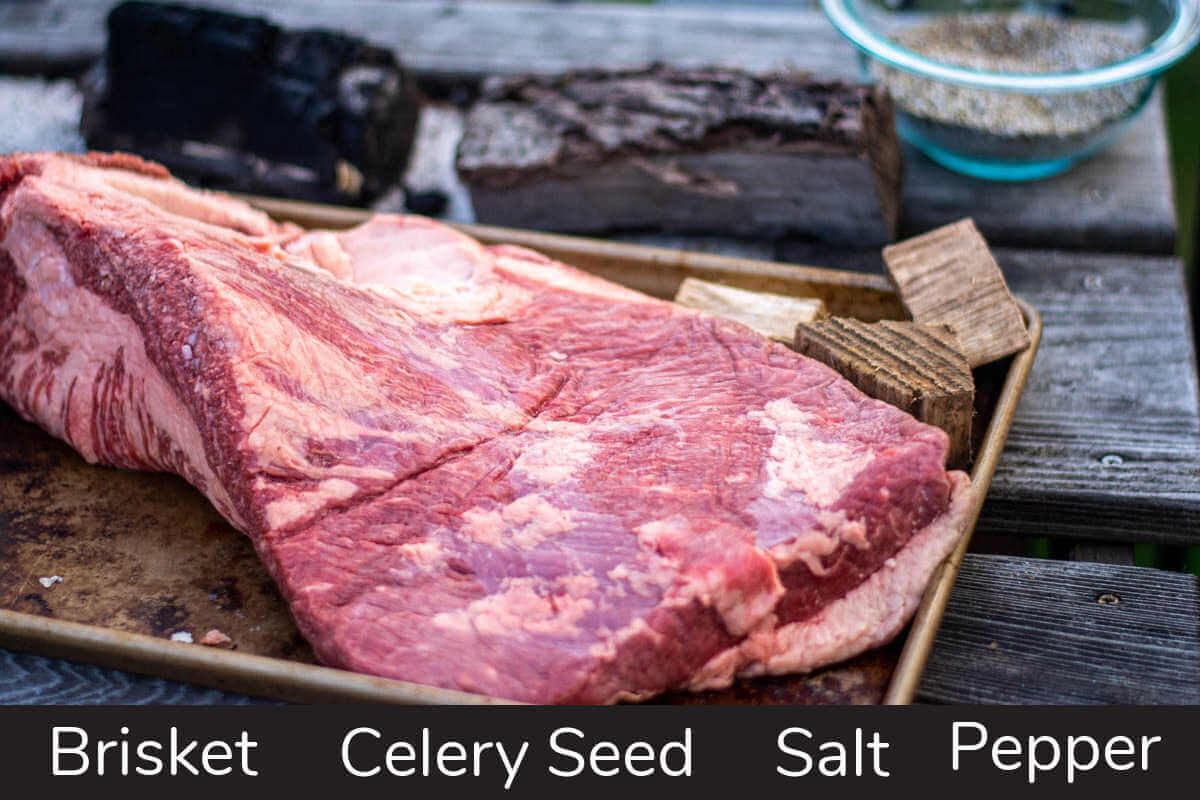
Salt & Pepper | You’ll need a dash of salt and pepper to enhance the flavor. You can always adjust the amounts to fit your likes.
Celery Seed | The flavor of the celery seed is amazing with this brisket. It’s subtle and not overwhelming.
Brisket | Make sure when you are shopping for brisket, you use a prime grade. It makes all the difference in the results.
🔥 Grilling Instructions
There are a few differences in the way that I attacked this one. I have to tell you – we went nuts over the end result!
Preparation
Step One: Cut off as much of the fat as possible, trimming the brisket down. I’ll be honest, I don’t always do it, but this time I spent a good twenty minutes trimming and had a plate full of the fat trimmings to show for it. It definitely made a difference, and I won’t skip this step in the future.
Step Two: Rub a basic salt, pepper and celery seed rub on only ONE SIDE of the brisket rather than both sides. I honestly don’t know how much of a difference that made, but the end result was extremely flavorful. It is possible it would have been too much had I coated both sides.
Grilling
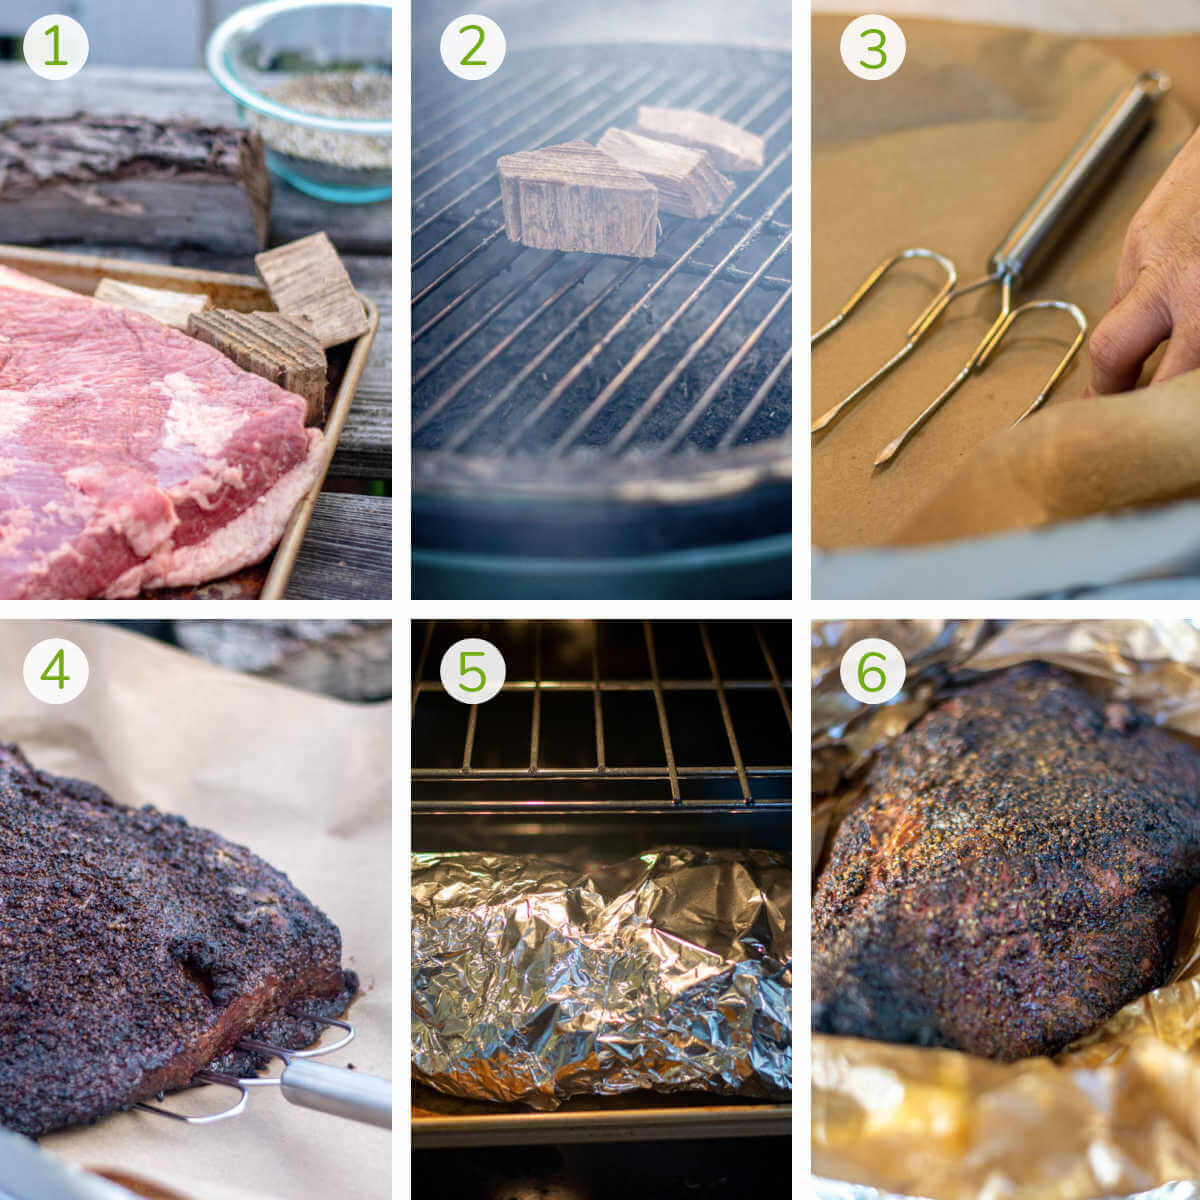
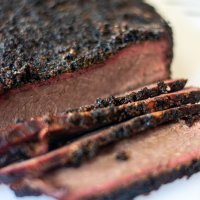
Step Three: Grill at 400 degrees over indirect heat for three hours. This allowed that crust to form with the rub. Usually, I go for the low-and-slow method, and I was a bit nervous in grilling this at such a high temperature, but it made a huge difference in the end result. The crust was fantastic!
Step Four: Place a couple of pieces of wood on the grating and underneath the brisket to create a little HUMP in the center that allows the juices to flow down off the sides. I read about this approach online and was anxious to try it out. No juices pooled on the surface, and the crust stayed intact.
Step Five: Spray the brisket with a little water every hour. This is to help make the outer bark of the crust of the brisket.
Wrapping and Finishing
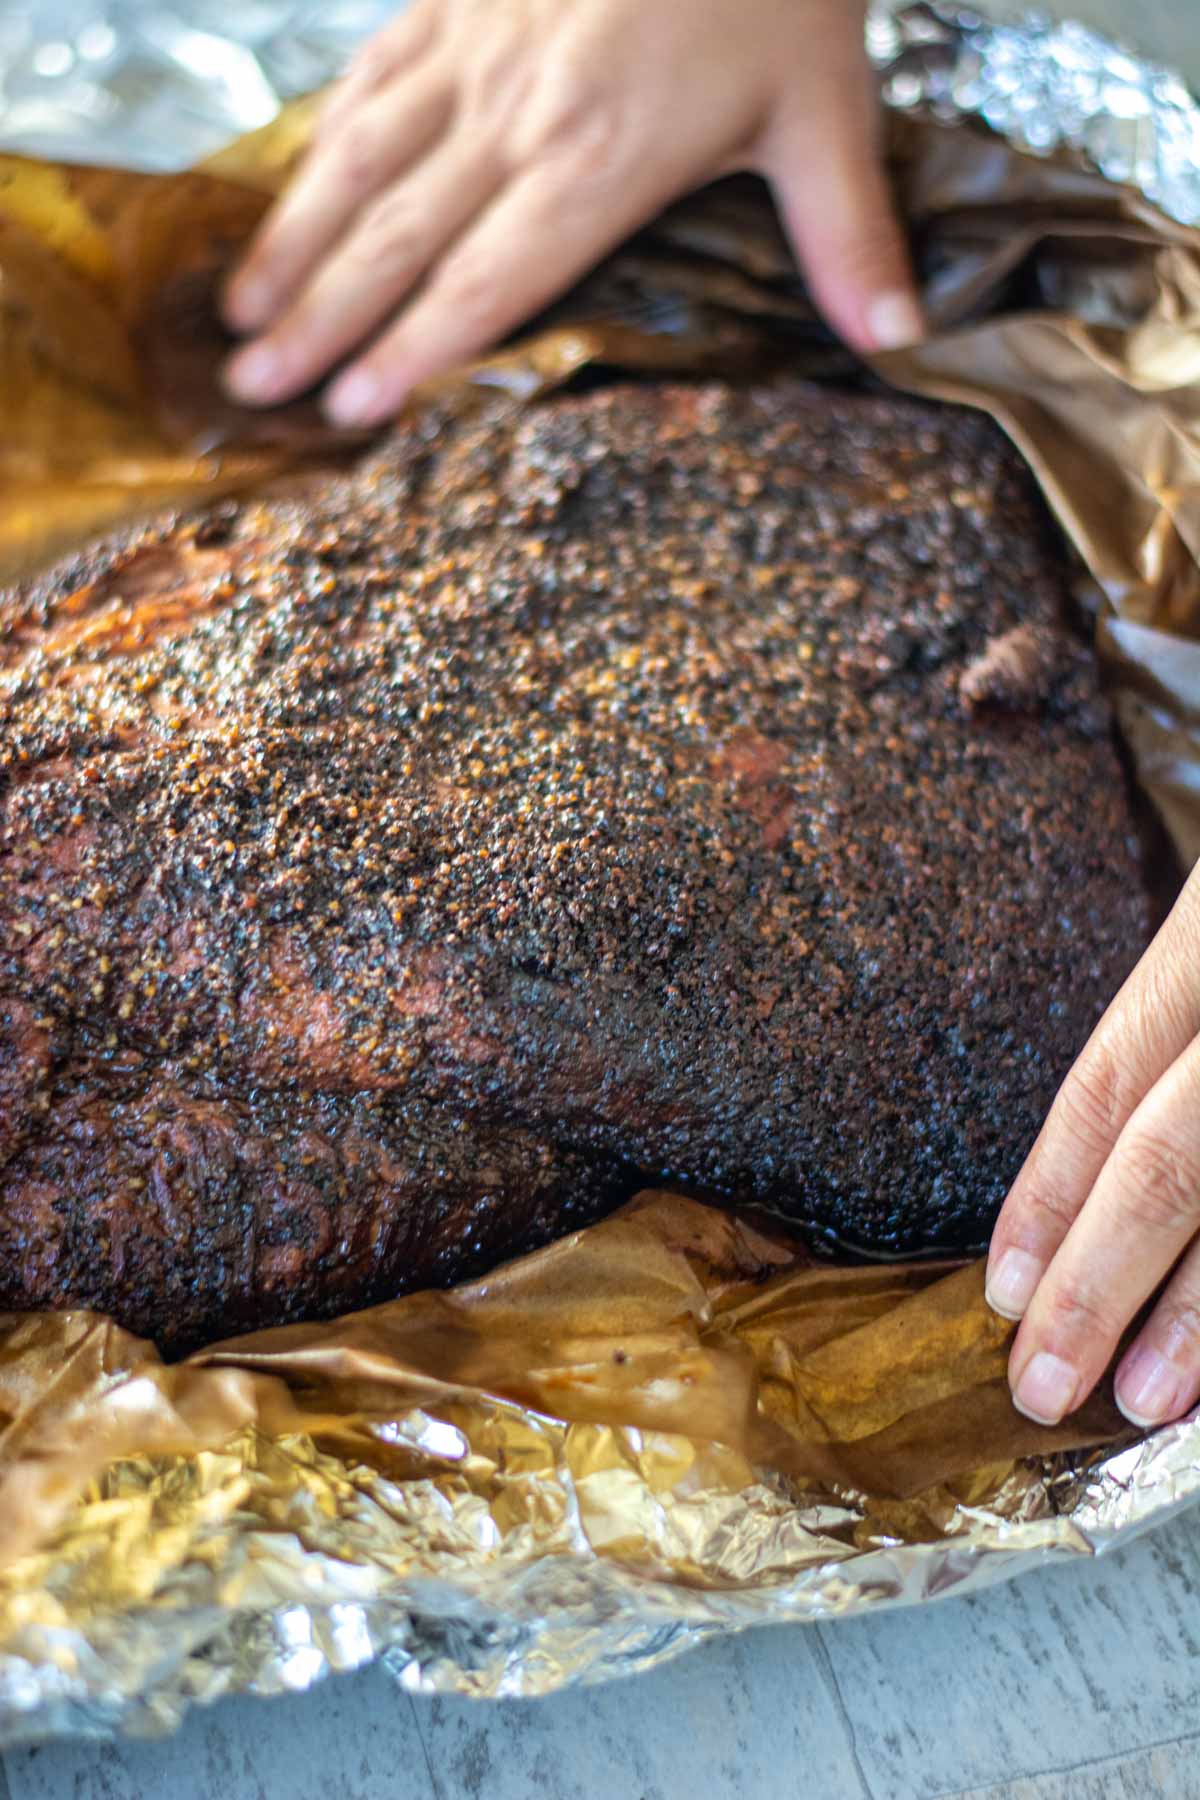
Step Six: Pull it off of the grill at the three hour mark (when the crust was getting hard) and transfer it to a sheet pan with two layers of foil topped with one layer of butcher paper. Lay the brisket on top and wrap it up completely. Leave it on a sheet pan and place in the oven at 275 for two hours.
When you take it out, allow it to rest for one hour before slicing it.
Note: To test to see if the brisket is done, stick a wooden skewer through the foil and into the meat. You are looking for very little resistance. That indicates that the internal temperature was hot enough to break down the connective tissues. If there is hesitation, it is not ready. The meat should be between 200 and 205 degrees at this point.

💡 Recipe Tips
There are several ways to prep this ahead of time.
- Make sure it is fully defrosted if it was frozen.
- Cut off the extra fat.
- Prepare the rub but don’t put it on yet.
Wrap up the brisket and put in the refrigerator to put on the grill the next day! This saves a good 15-20 minutes. I love to prep early and readers have expressed the same.
👨🍳 Recipe FAQs
To freeze, slice the brisket and wrap it in Press and Seal. Place it into a gallon sized, freezer-safe Ziploc bags. I like to double wrap them as the meat is expensive, and I have put a lot of work into it. If I do the double wrap, the meat comes out delish, and I love it in my lunches.
I love the taste of Hickory as it really complements the rub. My recommendation is to remember that a little goes a long way. You do not need three full hours of billowing smoke to impart the smoke flavor.
I add a few large chunks of hickory to the bottom of the Big Green Egg and then place the lump charcoal on top. As the charcoal burns, it will cause the wood to smoke. I prefer not to use small wood chips in the BGE, as I feel they burn away way too fast.
Only meat that has been graded by the USDA may use the USDA shield and designation on the packaging. There are three basic grades of brisket to choose from:
Select Grade: This is the lowest grade of beef and does not contain a high amount of fat or marbling. The meat will not be as flavorful and will be tougher than other cuts. If your goal is to use the brisket for other dishes, then select grades may be a good choice.
Choice Grade: This has more marbling than the Select Grade, and will be more flavorful and not as tough. This is most commonly found in Costco or butcher shops.
Prime Grade: This is the highest grade and signifies that it has the highest amount of marbling. This will result in extremely flavorful meat that will be tender. Watch your meat supplier carefully, as these are sometimes mixed in with the Choice Grades.
Certified Angus Beef: This is not a USDA grade, but it does represent a very high quality type of beef. It is only applicable to certain meat that meets their ten point quality score. If you see this, the meat will be of Choice or Prime Grade and will result in an excellent quality brisket.
No, brisket is beef and you can find it at the grocery store next to all the other steaks, roasts and ground beef.
Related Recipes

Tried this recipe? Please leave a star ⭐️⭐️⭐️⭐️⭐️ rating in the recipe card below and/or a review in the comments section further down the page. You can also stay in touch with me through social media by following me on Instagram, Pinterest, and Facebook!
Smoked Brisket
Ingredients
Brisket Rub
- ½ cup Coarse Black Pepper
- ½ cup Salt kosher or sea
- ¼ cup Celery Seed
Brisket
- 1 Brisket Prime Grade
Instructions
Prepare the Grill
- Set grill to 400 degrees. Add the plate setter to create an indirect cooking.
- Add lump wood to the bottom of the grill to create a light smoke.
- Add a few piece of wood to the grating. When it is time, lay the brisket on the wood to create a dome shape. This will allow any juices to run off quickly and not pool on hte surface of the meat. That might impact the formation of the bark.
Prepare the Brisket
- Trim the fat from the brisket. Spend a few minutes to cut the majority off. The brisket will have enough fat in the marbling.
Prepare the Rub
- Mix salt, pepper and celery seed together in a bowl. Rub on top side of the brisket only.
Grill the Brisket
- Place brisket on the grill grate with indirect heat.
- Lightly spray the brisket with water each hour. This will help form the crust on the brisket
- After three hours on indirect heat on grill, remove from grill. The brisket should have a nice dark crust.
Finish the Brisket in the Oven
- Remove the brisket from the grill and wrap it in two layers of foil and one layer of butcher paper on sheet pan.
- Place in the oven at 275 degrees. Keep it on a sheet pan in case of any drippings.
- Cook for two hours. Test internal temperature to be 200 – 205 degrees. You should be able to stick a skewer into the meat and have it slide in with no issues.
- Rest for at least an hour before slicing against the grain.
Notes
Nutrition

Jason’s been firing up the grill for over 30 years after graduating from the US Coast Guard Academy. His love of finely-grilled steak and chicken led him to buy his first Weber grill to put on his apartment patio in 1992. Each military move led to a new grill (a mixture of gas and charcoal) until he fell in love with the Big Green Egg in 2008. Since then, he has added another 4 grills to the collection. Yes, he has a problem. Jason loves smoking in the ceramic BGE with exotic woods including olive wood from Egypt and hard to find varieties such as sassafras and orange wood. Jason takes the term “foodie” to a whole new level, jumping at the chance to take food tours and cooking classes during foreign travels. These have provided inspiration to incorporate new ideas into recipes when he gets back home. He has been featured in Fox News, Parade, Yahoo News, Kansas City Living and more. After retiring from the military and moving to southwest Florida, he has focused grilling and smoking locally sourced meats and fish (read: he likes to catch his own fish!)

[…] made your yummy brisket using the Dry Rub Brisket or the Brisket Foil Method or your family’s own favorite brisket recipe and have lots of leftovers, so it’s time […]