Grilled goose is a fantastic option for a fun dinner and special occasion. A few key steps in preparation make all the difference in the world for creating a delicious dinner in less than two hours.

Believe it or not, the ancient Romans used to cook a goose for a holiday meal. Even more, a holiday goose was a special treat throughout Victorian England. It isn’t as common of a Christmas bird today, but if you are feeling nostalgic, it is time to recreate a historical and classic holiday recipe.
While some folks have trouble with grilling a goose, if you follow these tips, you’ll end up with a perfectly grilled bird!
🍗 Ingredients
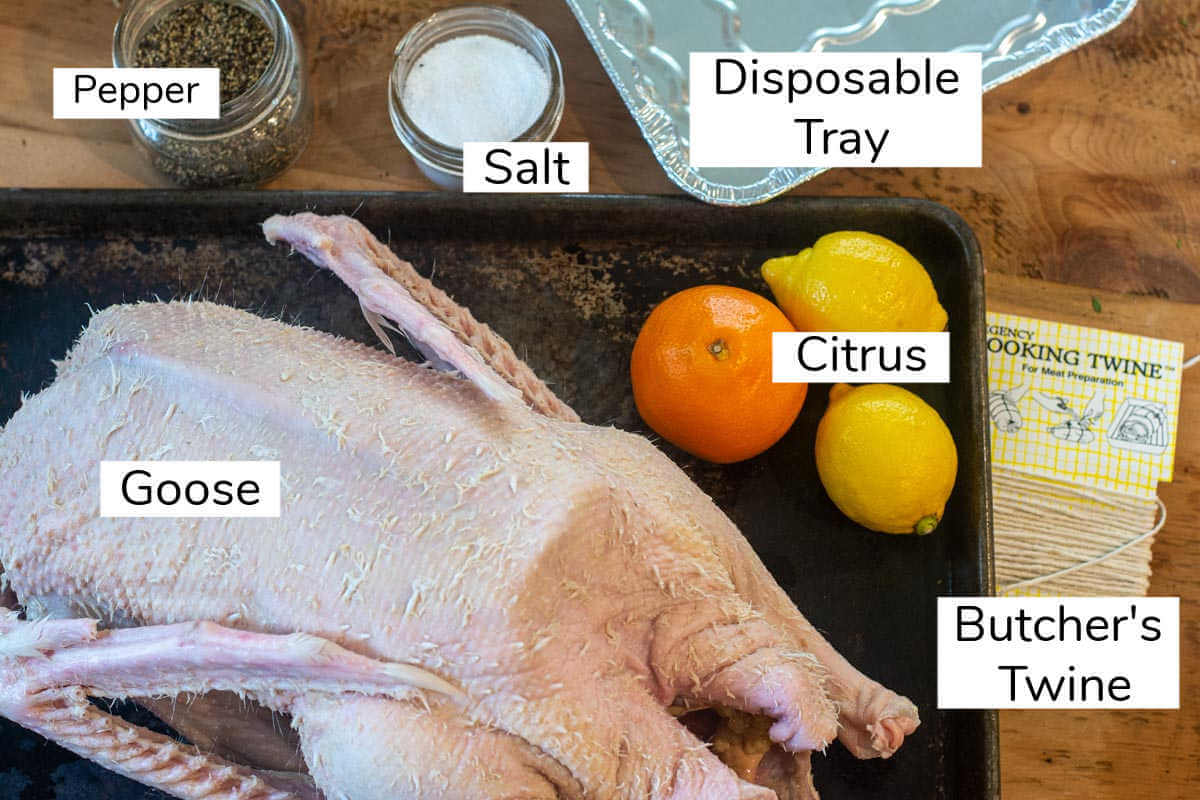
Goose – This is really the star of the show here. Believe it or not, virtually all butchered geese in the United States come from one producer, Schiltz Foods Inc. of Sisseton, South Dakota. You’ll notice that geese are more expensive than chicken or turkey, and that is because they only lay eggs in the spring. So, it is more difficult to plan for changes in demand.
This is a dark meat bird. While the USDA classifies it as white meat, ask anyone who has cooked a goose – it is dark meat. The color comes from myoglobin. That is a protein that delivers oxygen to the muscles. Since geese are highly migratory, they need more oxygen to their muscles to power through those long flights. That is also why geese have a lot of fat under their skin. It is an energy reserve, an insulation for colder temperatures, and assists with buoyancy as they swim.
Now that science class is over 😀, the reason that information is important is that a low-and-slow grilling is ideal to allow the connective tissue to break down and give the fat time to render and escape into your drip pan.
It is avant-garde to cook the goose to a medium rare (I can’t bring myself to do that). The USDA still recommends that it be cooked to 165 degrees. This is one area where I do like to remain a rule follower!
🔪 Preparation
This is the key to a perfect grilled bird. While the grilling phase of this recipe gets all the attention, it is the preparation phase that determines how well the bird turns out.
If it is still frozen, place it on a sheet pan in the refrigerator, so if there are any leaks from the packaging, it won’t leak all over. Let’s not ask how I learned that lesson!

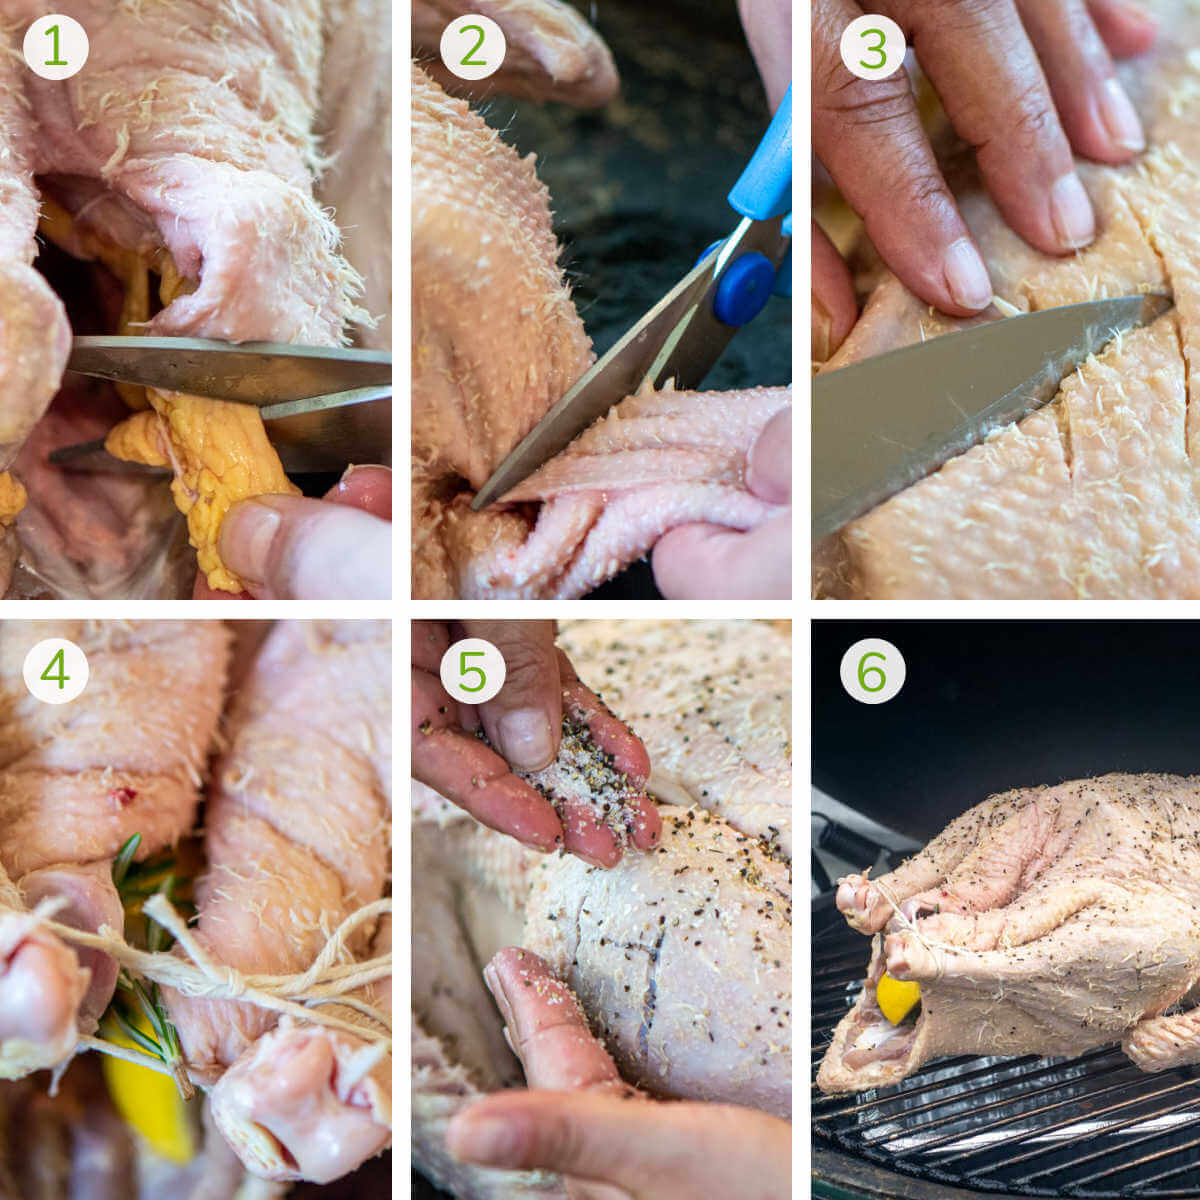
Step One: Remove the goose from the fridge and let it come to room temperature. Remove the packaging and place the neck and giblets aside.
Step Two: You’ll notice that there are sections of visible fat inside the cavity. Use kitchen shears to cut that out. Don’t throw it away! The goose fat is highly prized, and we’ll use it later for rendering.
Schmaltz – This is the highly prized rendered fat from a goose. For religions that prohibit cooking with pork, the best alternative for pig fat is fat from a goose.
Step Three: Cut away the flaps of skin around the opening to the body cavity. If I was stuffing the bird, I would pin the flaps over the stuffing to keep the goodies inside, but I find it better to grill the bird without stuffing.
Cut off the wing tips too. Keep them with the fat.
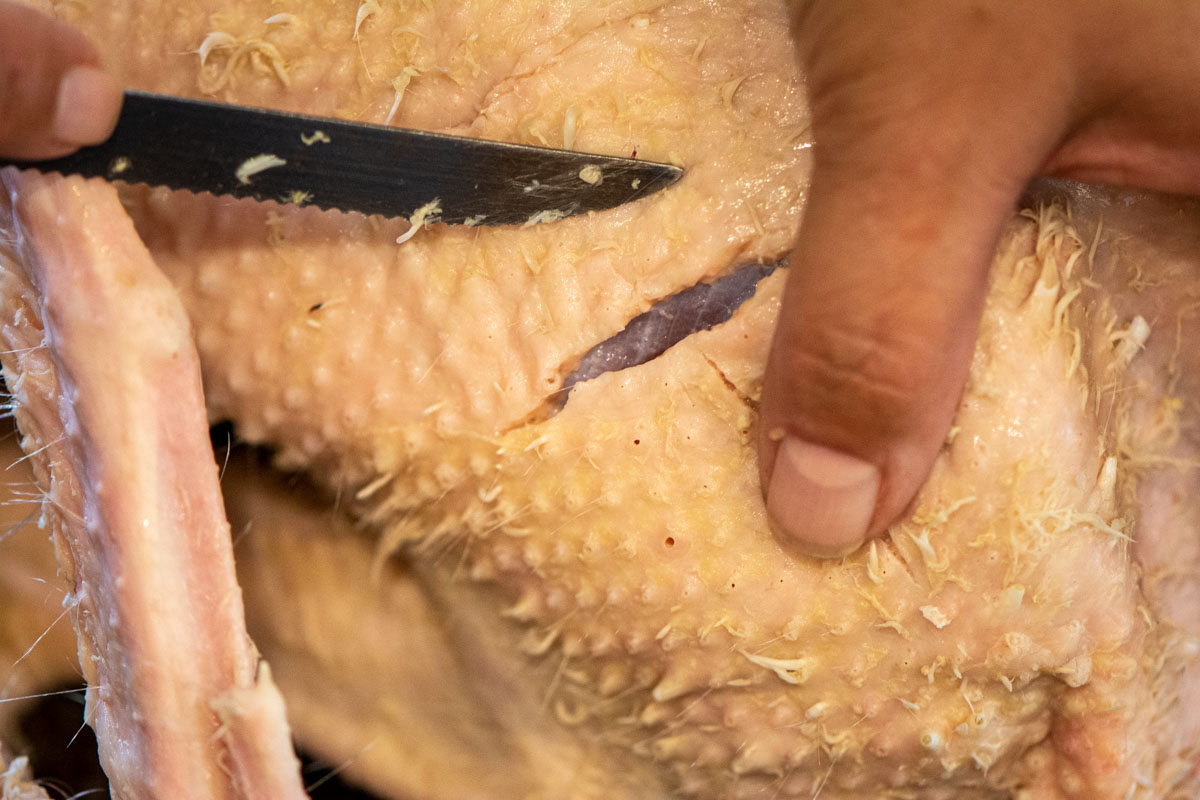
As noted above, there is a lot of fat between the meat and the skin. As that heats up, it will liquify, a process called rendering, and that needs a place to escape. If it can’t escape, it will stick with the meat and cause it to become greasy.
Step Four: There are two options at this point.
- Slice the skin in a series of crosshatch patterns, making sure not to cut into the skin. This provides ample room for the rendered fat to drip away from the goose. This option is most effective, but doesn’t look as pretty when you remove it from the grill. Just remember that you’re going to be cutting into it in a few minutes anyways!
- Use a sharp, thick needle to poke lots of holes in the skin. If you choose this option, it is better to poke too many than not enough.
Step Five: Truss the legs with butcher’s twine to keep them tidy.
Step Six: Season the skin with a simple kosher salt and pepper rub. The goose is so flavorful that you don’t want to overpower it with a more complex dry rub.
Step Seven: Place a sliced lemon and fresh herbs in the cavity. These will provide a very mild flavor as the goose cooks.
🔥 Grilling Instructions
Set the grill for indirect cooking. For a gas grill, turn off the center burners. For a Big Green Egg, add the plate setter.

Step One: Add a drip pan to capture the rendered fat. If you don’t the fat may drip on to the heat source and create an acrid smoke. It is just easier to capture it in the drip pan. I used a small disposable aluminum one.
Step Two: Set the temperature to 325 degrees. A cooler grill means a longer cook, which is critical to give the fat beneath the skin enough time to render out of the bird.
Step Three: Set the goose on the grill with the breast side up.
Step Four: Let the goose slowly cook for about 2-3 hours. It will take approximately 20 minutes per pound until it reaches a few degrees below the minimum recommended safe eating temperature of 165 degrees. Take it off a few degrees cooler, as it will continue to heat for a few more minutes.
Use a wireless meat thermometer to monitor the temperature. I programmed mine to sound an alarm when the temperature reached 160 degrees.
Step Five: Remove the goose and take it inside. Cover with aluminum foil and let it rest for 15 minutes. I recommend setting it on a cooling rack over a sheet pan. There will still be some fat that renders out, and I find the cooling rack lets it drip down and away from the bird.

Grilling Options
Spatchcock – If you want to speed up the grilling process, especially for larger geese, consider cutting down the spine with poultry shears and then flattening the goose.
This lets more of the goose rest on the grill grate and it will cook evenly and quickly. For a detailed explanation of spatchcocking (also called butterflying), refer to this Spatchocked Cornish Hens or Butterflied Turkey recipes. The principle is the same.
Brining – Brining is intended to add moisture and a light flavoring to meats. I have never had a problem with a goose becoming dry (like a turkey or a chicken might), and the thick skin and layer of fat makes it difficult for the brine to penetrate into the meat. I never noticed much of a difference with brining this.
Smoking – Lower the temperature to 275 and add wood chips to the grill. I prefer light aromatic fruit woods, like apple. The lower temperature means it will need to stay on the grill longer. Expect it to take up to 30 minutes per pound. Don’t forget the drip pan.
👩🍳 Recipe FAQs
You’ll notice that we left the little baby excess feathers on the skin. It’s fine if you are not planning on eating the skin, which we weren’t. If you do want to eat the skin, use a kitchen blow torch and simply fire off the baby feathers. Just allow the torch to gently graze the skin a little bit and they come right off. If you are worried about the skin being a little bit darker since you took the blow torch to it, don’t be. Once it’s cooked, you won’t notice it at all and you’ll be left with the gorgeous golden skin we all love.
It is a dark meat, and my initial impression is that it tastes similar to roast beef. Seriously. It is much darker than even the dark meat of a turkey.
The meat itself isn’t that greasy, especially if you take time with the preparation. There is a lot of fat between the skin and the meat, and it will render into the meat unless you generously score the skin.
You will see some restaurants serve goose medium rare, but the USDA still classifies this as a fowl and recommends a temperature of 165 degrees. It is better to be safe than sorry.
Related Recipes


Tried this recipe? Please leave a star ⭐️⭐️⭐️⭐️⭐️ rating in the recipe card below and/or a review in the comments section further down the page. You can also stay in touch with me through social media by following me on Instagram, Pinterest, and Facebook!

Simple Grilled Goose
Ingredients
- 1 Goose 6-8 lb
- Herbs fresh, rosemary, thyme and parsley
- 1 Oranges
- 1 Lemons
- ¼ cup Salt and Pepper
Instructions
Preparation Instructions
- Remove the innards from the goose. Keep them for making a gravy.
- Trim the fat inside the bird with kitchen shears. Keep that fat to render into schmaltz. Spend the time to remove as much as you can.
- Trim the excess skin around the cavity.
- Insert cut oranges, lemons and fresh herbs into the cavity.
- Lightly score the skin in numerous locations. There is a fatty layer under the skin, and the fat needs a place to escape. Be generous in the slices.
- Rub the skin with salt and pepper and then truss up the legs with Butcher's twine.
Grilling Instructions
- Set the grill temperature to 325 degrees. This is critical to give the fat beneath the skin enough time to render out of the bird. Set the grill for indirect cooking. For a gas grill, turn off the center burners. For a Big Green Egg, add the plate setter.
- Make sure to add a drip pan to capture the rendered fat. If you don’t, the fat may drip on to the heat source and create an acrid smoke. It is just easier to capture it in the drip pan. I used a small disposable aluminum one.
- Set the goose on the grill with the breast side up.
- Let the goose slowly cook for about 2-3 hours. It will take approximately 20 minutes per pound until it reaches a few degrees below the minimum recommended safe eating temperature of 165 degrees. Take it off a few degrees early. It will rise in temperature for a few more minutes.
- Use a wireless meat thermometer to monitor the temperature. I programmed mine to sound an alarm when the temperature reached 160 degrees.
- Remove the goose and cover with aluminum foil and let it rest for 15 minutes. I recommend setting it on a cooling rack over a sheet pan. There will still be some fat that renders out, and I find the cooling rack lets it drip down and away from the bird. Slice up and serve.
Notes

Jason’s been firing up the grill for over 30 years after graduating from the US Coast Guard Academy. His love of finely-grilled steak and chicken led him to buy his first Weber grill to put on his apartment patio in 1992. Each military move led to a new grill (a mixture of gas and charcoal) until he fell in love with the Big Green Egg in 2008. Since then, he has added another 4 grills to the collection. Yes, he has a problem. Jason loves smoking in the ceramic BGE with exotic woods including olive wood from Egypt and hard to find varieties such as sassafras and orange wood. Jason takes the term “foodie” to a whole new level, jumping at the chance to take food tours and cooking classes during foreign travels. These have provided inspiration to incorporate new ideas into recipes when he gets back home. He has been featured in Fox News, Parade, Yahoo News, Kansas City Living and more. After retiring from the military and moving to southwest Florida, he has focused grilling and smoking locally sourced meats and fish (read: he likes to catch his own fish!)


Leave a Reply